
eMailerOOo
prrvchr@gmail.com
The LibreOffice emailer application with the best email API available for BASIC
 Documentation
Ce document en français.
The use of this software subjects you to our Terms Of Use and Data Protection Policy.
version 1.5.2
Introduction:
eMailerOOo is part of a Suite of LibreOffice and/or OpenOffice extensions allowing to offer you innovative services in these office suites.
This extension allows you to send documents in LibreOffice as an email, possibly by mail merge, to your telephone contacts.
It also provides an API allowing you to send emails in BASIC and supporting the most advanced technologies: OAuth2 protocol, Mozilla IspDB, HTTP instead of SMTP/IMAP for Google servers…
A macro SendEmail for sending emails is provided as an example. If you open a document beforehand, you can launch it by:
Tools -> Macros -> Run Macro… -> My Macros -> eMailerOOo -> SendEmail -> Main -> Run
Being free software I encourage you:
- To duplicate its source code.
- To make changes, corrections, improvements.
- To open issue if needed.
- To participate in the costs of CASA certification.
In short, to participate in the development of this extension.
Because it is together that we can make Free Software smarter.
CASA certification:
To ensure interoperability with Google, the eMailerOOo extension uses the OAuth2OOo extension which requires CASA certification.
Until now, this certification was free and carried out by a Google partner.
The OAuth2OOo application obtained its CASA certification on 11/28/2023.
Now this certification has become paid and costs $600.
I never anticipated such costs and I am counting on your contribution to finance this certification.
Thank you for your help.

Requirement:
The eMailerOOo extension uses the OAuth2OOo extension to work.
It must therefore meet the requirement of the OAuth2OOo extension.
The eMailerOOo extension uses the jdbcDriverOOo extension to work.
It must therefore meet the requirement of the jdbcDriverOOo extension.
Additionally, eMailerOOo requires the jdbcDriverOOo extension to be configured to provide com.sun.star.sdb as the API level, which is the default configuration.
Installation:
It seems important that the file was not renamed when it was downloaded.
If necessary, rename it before installing it.
-
 Install OAuth2OOo.oxt extension
 You must first install this extension, if it is not already installed.
-
 Install jdbcDriverOOo.oxt extension
 This extension is necessary to use HsqlDB version 2.7.2 with all its features.
-
If you don’t have a datasource, you can:
-
 Install vCardOOo.oxt extension
 This extension is only necessary if you want to use your contacts present on a Nextcloud platform as a data source for mailing lists and document merging.
-
 Install gContactOOo.oxt extension
 This extension is only needed if you want to use your personal phone contacts (Android contact) as a data source for mailing lists and document merging.
-
 Install mContactOOo.oxt extension
 This extension is only needed if you want to use your Microsoft Outlook contacts as a data source for mailing lists and document merging.
-
 Install HyperSQLOOo.oxt extension
 This extension is only necessary if you want to use a Calc file as a data source for mailing lists and document merging. See: How to import data from a Calc file.
-
-
 Install eMailerOOo.oxt extension


Restart LibreOffice after installation.
Be careful, restarting LibreOffice may not be enough.
- On Windows to ensure that LibreOffice restarts correctly, use Windows Task Manager to verify that no LibreOffice services are visible after LibreOffice shuts down (and kill it if so).
-
Under Linux or macOS you can also ensure that LibreOffice restarts correctly, by launching it from a terminal with the command
sofficeand using the key combinationCtrl + Cif after stopping LibreOffice, the terminal is not active (no command prompt).
Use:
Introduction:
To be able to use the email merge feature using mailing lists, it is necessary to have a datasource with tables having the following columns:
- One or more email addresses columns. These columns are chosen from a list and if this choice is not unique, then the first non-null email address column will be used.
- One or more primary key column to uniquely identify records, it can be a compound primary key. Supported types are VARCHAR and/or INTEGER, or derived. These columns must be declared with the NOT NULL constraint.
In addition, this datasource must have at least one main table, including all the records that can be used during the email merge.
If you do not have such a datasource then I invite you to install one of the following extensions:
- vCardOOo. This extension will allow you to use your contacts present on a Nextcloud platform as a data source.
- gContactOOo. This extension will allow you to use your Android phone (your phone contacts) as a datasource.
- mContactOOo. This extension will allow you to use your Microsoft Outlook contacts as a datasource.
- HyperSQLOOo. This extension will allow you to use a Calc file as a datasource. See: How to import data from a Calc file.
For the first 3 extensions the name of the main table can be found (and even changed before any connection) in:
Tools -> Options -> Internet -> Extension name -> Main table name
This mode of use is made up of 3 sections:
Merge emails with mailing lists:
Requirement:
To be able to post emails to a mailing list, you must:
- Have a datasource as described in the previous introduction.
- Open a new document in LibreOffice Writer.
This Writer document can include merge fields (insertable by the command: Insert -> Field -> More fields -> Database -> Mail merge fields), this is even necessary if you want to be able to customize the content of the email and any attached files.
These merge fields should only refer to the main table of the datasource.
If you want to use an existing Writer document, you must also ensure that the datasource and the main table are attached to the document in: Tools -> Address Book Source.
If these recommendations are not followed then merging of documents will not work and this silently.
Starting the mail merge wizard:
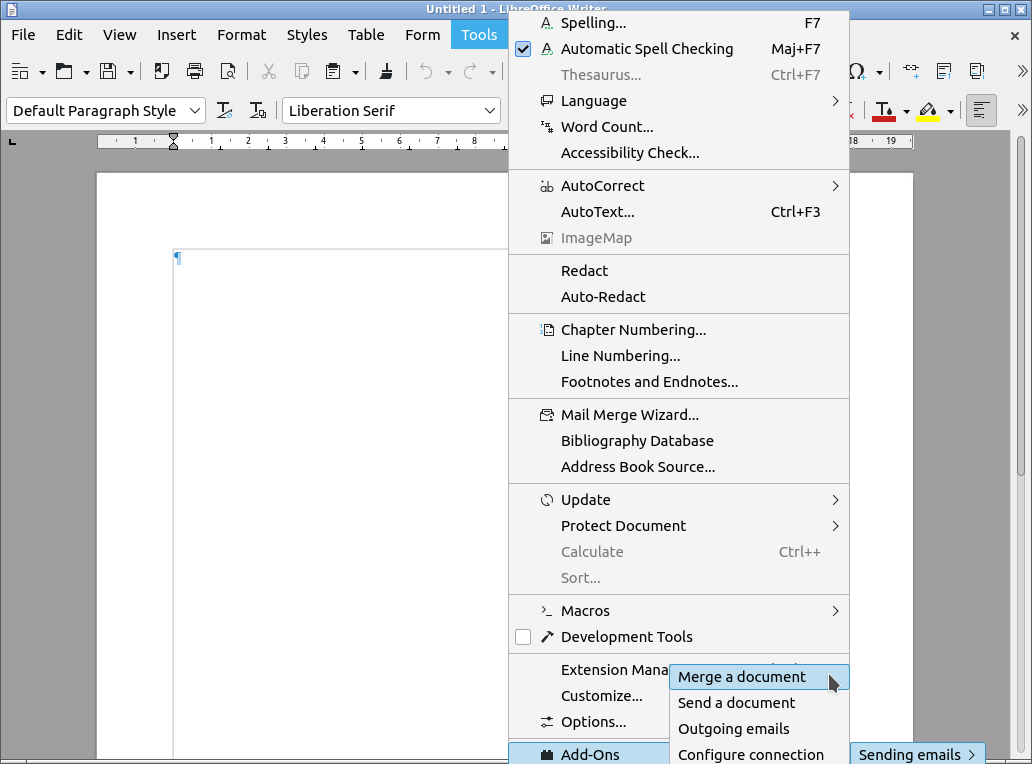
In LibreOffice Writer document go to: Tools -> Add-Ons -> Sending emails -> Merge a document
Data source selection:
The datasource load for the Email merging wizard should appear:
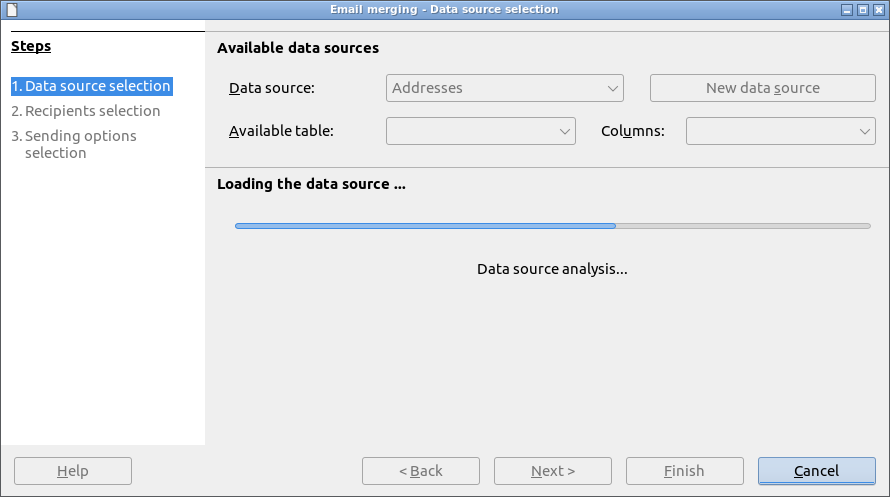
The following screenshots use the gContactOOo extension as the datasource. If you are using your own datasource, it is necessary to adapt the settings in relation to it.
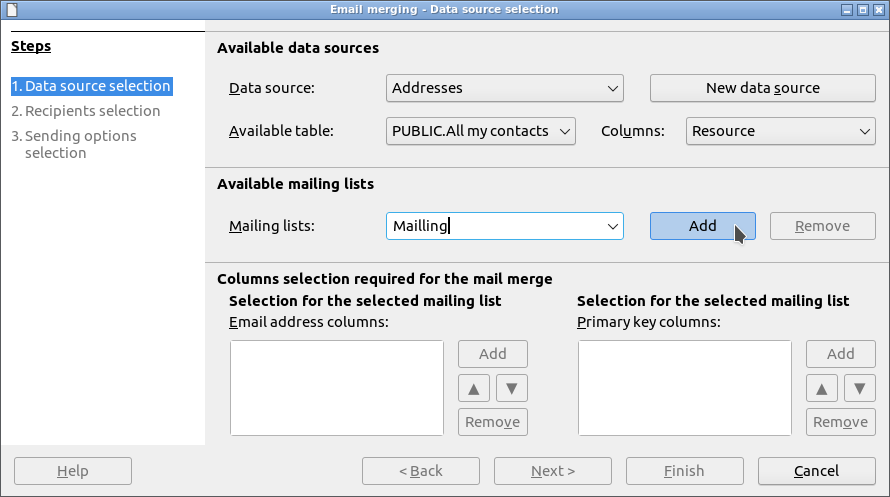
In the following screenshot, we can see that the datasource gContactOOo is called: Addresses and that in the list of tables the table: PUBLIC.All my contacts is selected.

If no mailing list exists, you need to create one, by entering its name and validating with: ENTER or the Add button.
Make sure when creating the mailing list that the main table is always selected in the list of tables.
If this recommendation is not followed then merging of documents will not work and this silently.
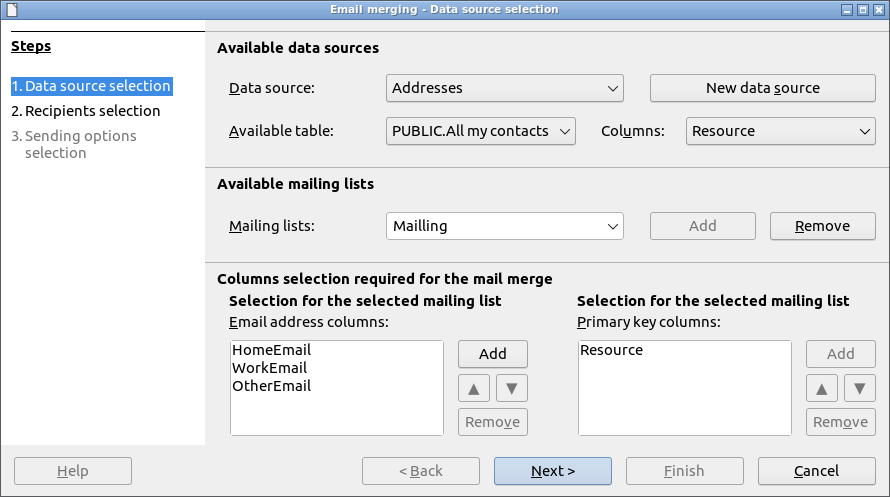
Now that your new mailing list is available in the list, you need to select it.
And add the following columns:
- Primary key column:
Uri - Email address columns:
HomeEmail,WorkEmailandOtherEmail
If several columns of email addresses are selected, then the order becomes relevant since the email will be sent to the first available address.
In addition, on Recipients selection step of the wizard, in the Available recipients tab, only records with at least one email address column entered will be listed.
So make sure you have an address book with at least one of the email address field (Home, Work or Other) entered.
This setting is to be made only for new mailing lists.
You can now proceed to the next step.
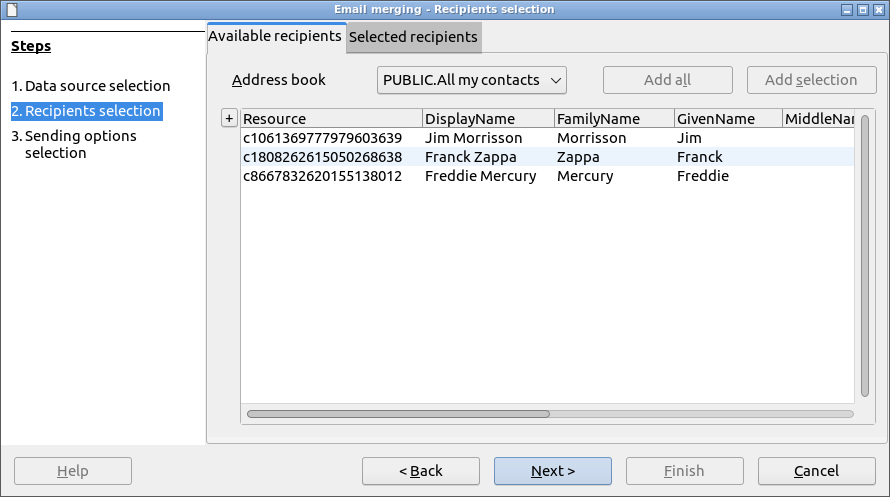
Recipients selection:
Available recipients:
The recipients are selected using 2 buttons Add all and Add allowing respectively:
- Either add the group of recipients selected from the
Address booklist. This allows during a mailing, that the modifications of the contents of the group are taken into account. A mailing list only accepts one group. - Either add the selection, which can be multiple using the
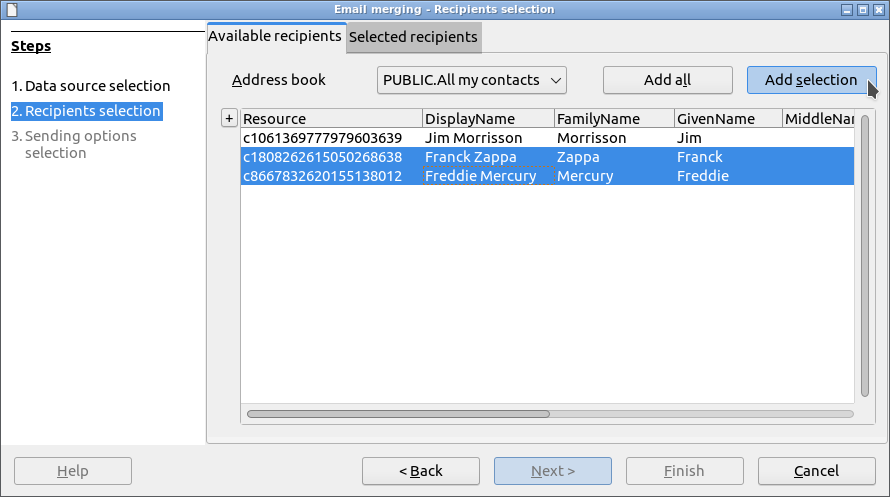
CTRLkey. This selection is immutable regardless of the modification of the address book groups.
Example of multiple selection:
Selected recipients:
The recipients are deselected using 2 buttons Remove all and Remove allowing respectively:
- Either remove the group that has been assigned to this mailing list. This is necessary in order to be able to edit the content of this mailing list again.
- Either remove the selection, which can be multiple using the
CTRLkey.
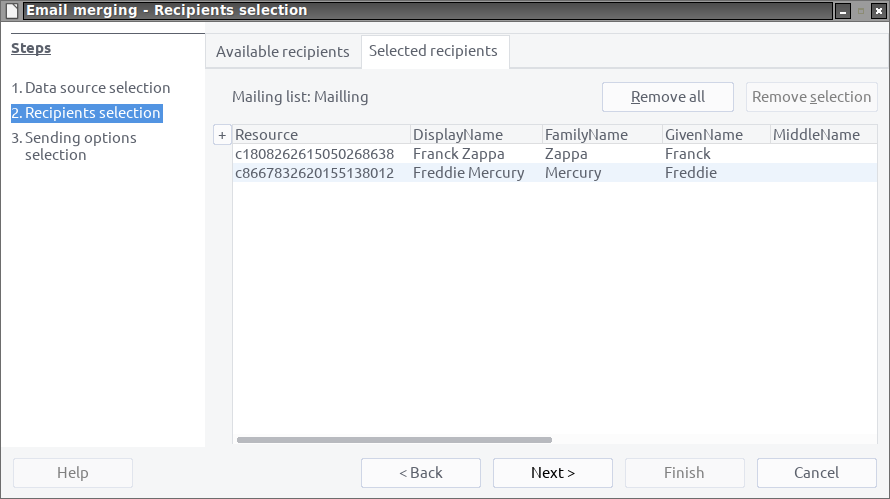
If you have selected at least 1 recipient, you can proceed to the next step.
Sending options selection:
If this is not already done, you must create a new sender using the Add button.
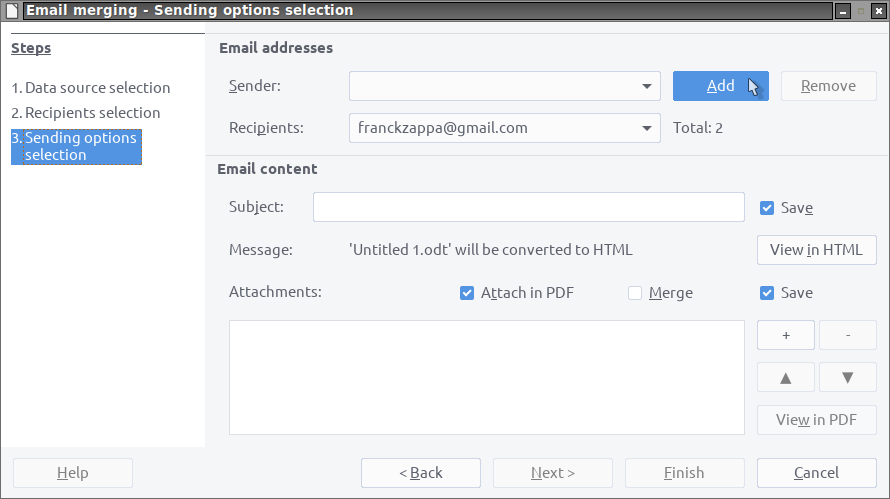
The creation of the new sender is described in the Configure connection section.
The email must have a subject. It can be saved in the Writer document.
You can insert merge fields in the email subject. A merge field is composed of an opening brace, the name of the referenced column (case sensitive) and a closing brace (ie: {ColumnName}).

The email may optionally have attached files. They can be saved in the Writer document.
The following screenshot shows 1 attached file which will be merged on the data source then converted to PDF format before being attached to the email.
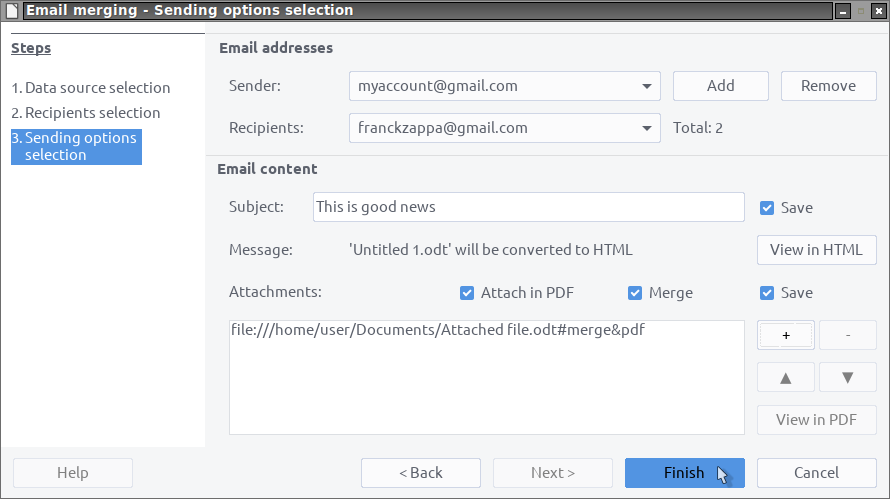
Make sure to always exit the wizard with the Finish button to confirm submitting the send jobs.
To submit mailing jobs, please follow the section Outgoing emails.
Configure connection:
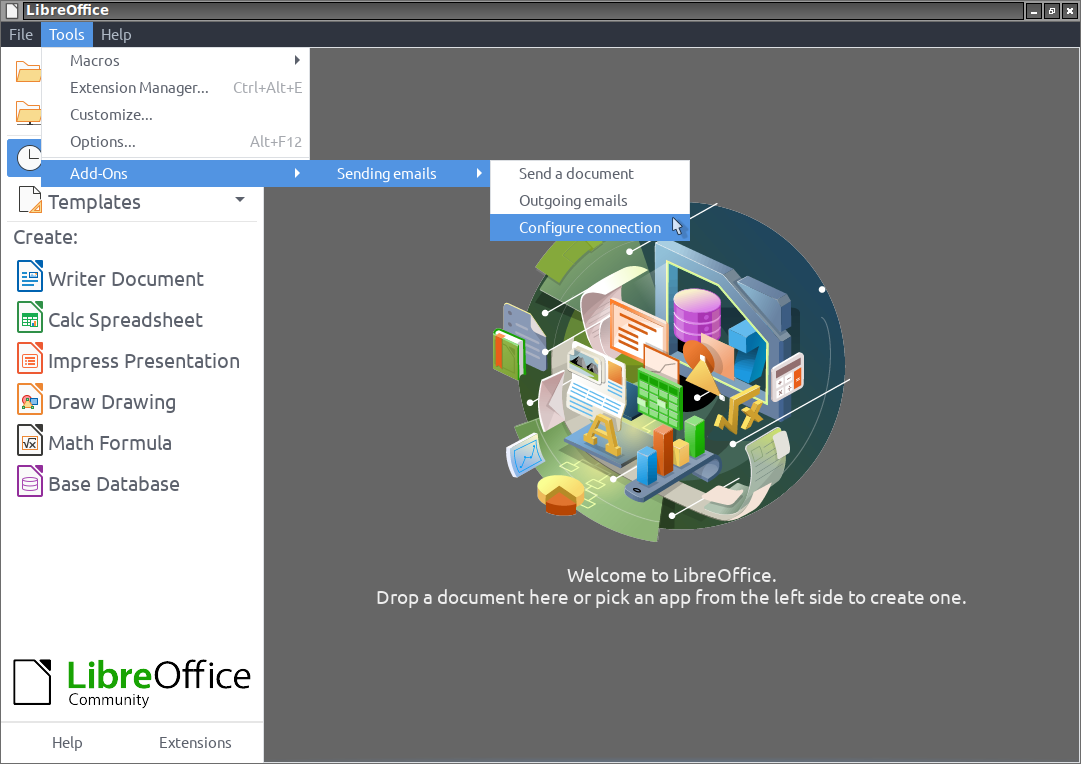
Starting the connection wizard:
In LibreOffice go to: Tools -> Add-Ons -> Sending emails -> Configure connection
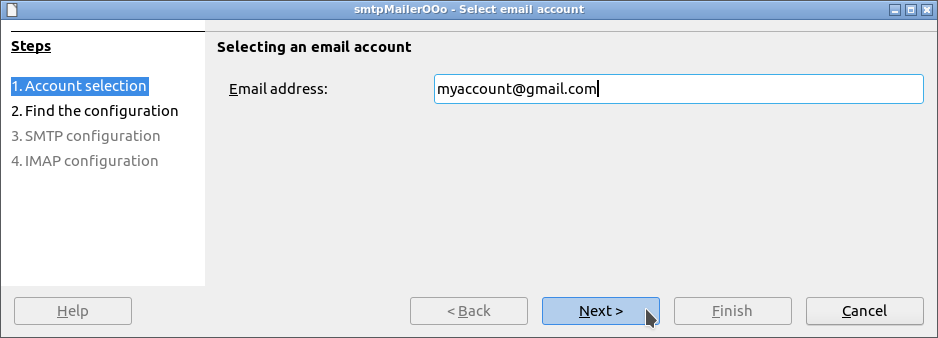
Account selection:
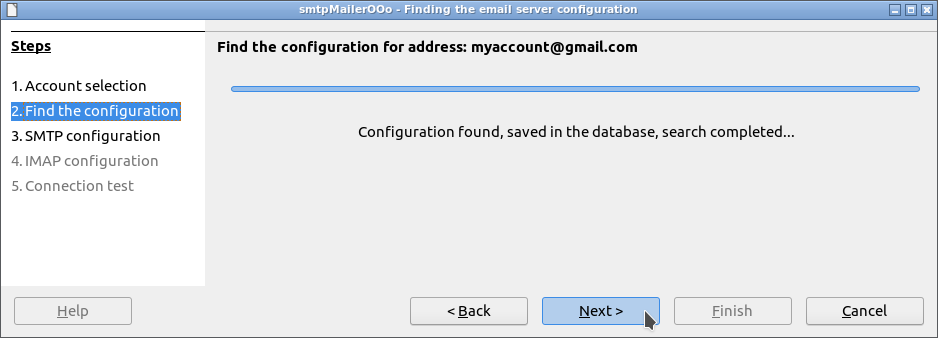
Find the configuration:
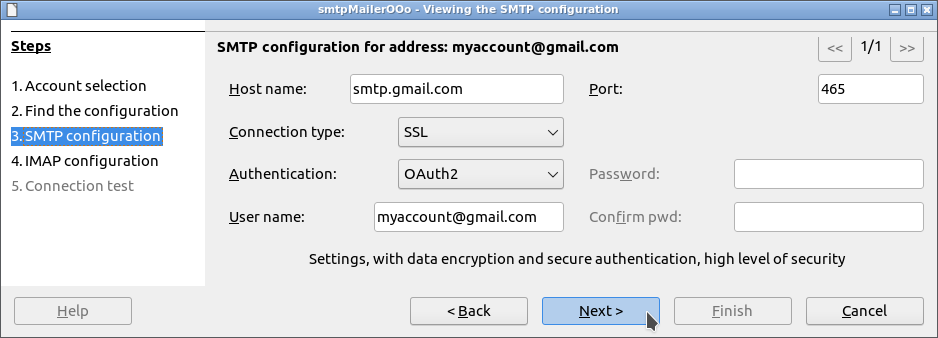
SMTP configuration:
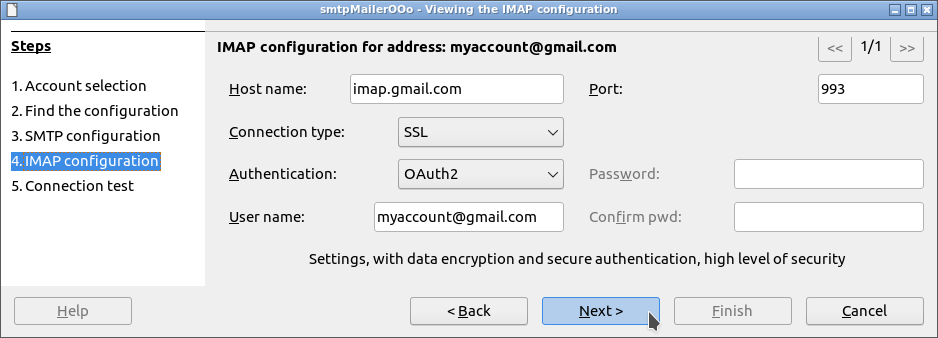
IMAP configuration:
Connection test:
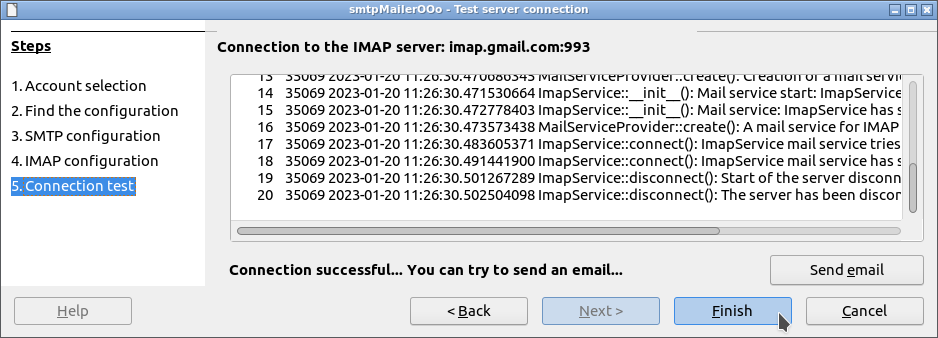
Always exit the wizard with the Finish button to save the connection settings.
Outgoing emails:
Starting the email spooler:
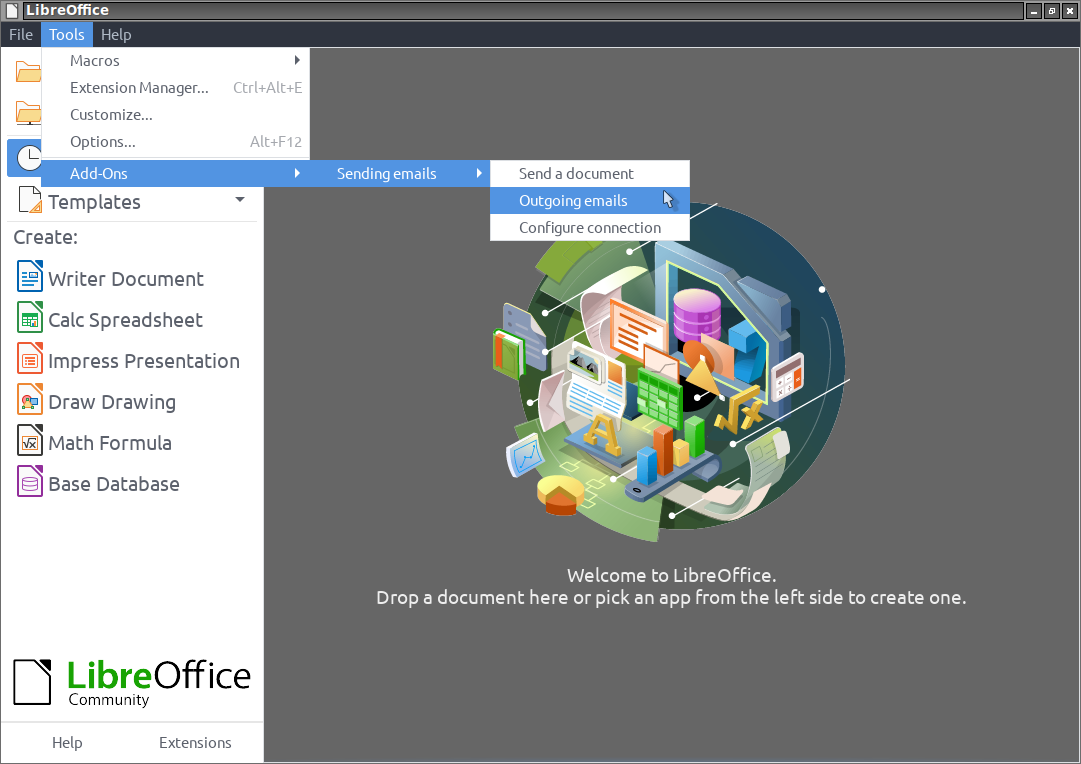
In LibreOffice go to: Tools -> Add-Ons -> Sending emails -> Outgoing emails
List of outgoing emails:
Each send job has 3 different states:
- State 0: the email is ready for sending.
- State 1: the email was sent successfully.
- State 2: An error occurred while sending the email. You can view the error message in the Spooler activity log.
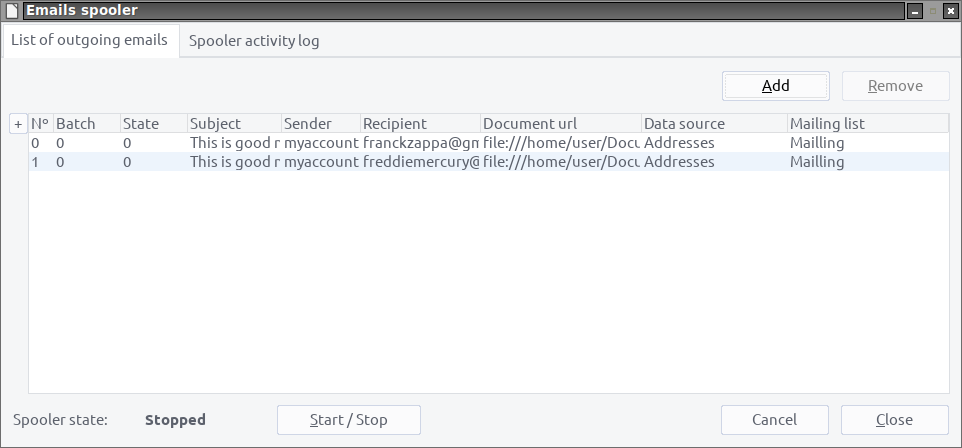
The email spooler is stopped by default. It must be started with the Start / Stop button so that the pending emails are sent.
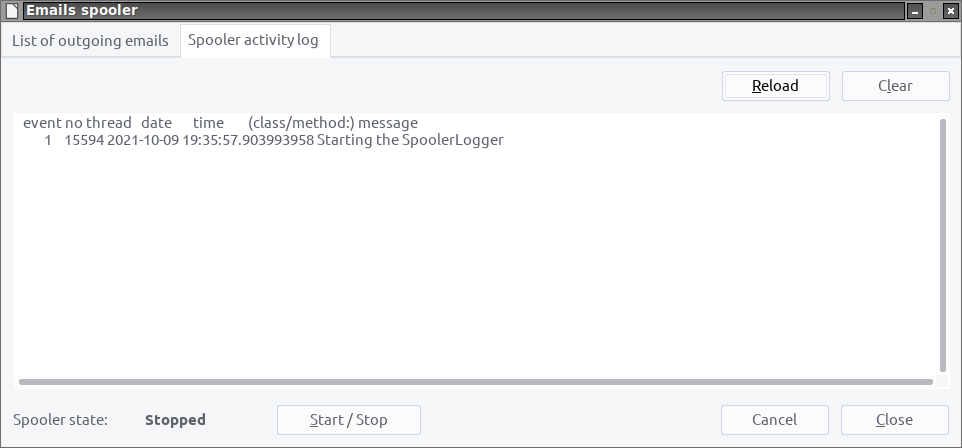
Spooler activity log:
When the email spooler is started, its activity can be viewed in the activity log.
Sending email with a LibreOffice macro in Basic:
It is possible to send emails using macros written in Basic. Sending an email requires a macro of some 50 lines of code and will support most SMTP/IMAP servers.
Here is the minimum code needed to send an email with attachments.
Sub Main

    Rem Ask the user for a sender's email address.
    sSender = InputBox("Please enter the sender's email address")
    Rem User clicked Cancel.
    if sSender = "" then
        exit sub
    endif

    Rem Ask the user for recipient's email address.
    sRecipient = InputBox("Please enter the recipient's email address")
    Rem User clicked Cancel.
    if sRecipient = "" then
        exit sub
    endif

    Rem Ask the user for email's subject.
    sSubject = InputBox("Please enter the email's subject")
    Rem User clicked Cancel.
    if sSubject = "" then
        exit sub
    endif

    Rem Ask the user for email's content.
    sBody = InputBox("Please enter the email's content")
    Rem User clicked Cancel.
    if sBody = "" then
        exit sub
    endif

    Rem Ok now we have everything, we start sending an email.

    Rem We will use 4 UNO services which are:
    Rem - com.sun.star.mail.MailUser: This is the service which will ensure the correct configuration
    Rem   of SMTP and IMAP servers (we can thank Mozilla for the ISPBD database that I use).
    Rem - com.sun.star.mail.MailServiceProvider: This is the service that allows you to use SMTP and
    Rem   IMAP servers. We will use this service with the help of the previous service.
    Rem - com.sun.star.datatransfer.TransferableFactory: This service is a forge for the creation of
    Rem   Transferable which are the basis of the body of the email as well as these attached files.
    Rem - com.sun.star.mail.MailMessage: This is the service that implements the email message.
    Rem Now that everything is clear we can begin.


    Rem First we create the email.

    Rem This is our Transferable forge, it greatly simplifies the LibreOffice mail API...
    oTransferable = createUnoService("com.sun.star.datatransfer.TransferableFactory")

    Rem oBody is the body of the email. It is created here from a String but could also
    Rem have been created from an InputStream, a file Url (file://...) or a sequence of bytes.
    oBody = oTransferable.getByString(sBody)

    Rem oMail is the email message. It is created from the com.sun.star.mail.MailMessage service.
    Rem It can be created with an attachment with the createWithAttachment() method.
    oMail = com.sun.star.mail.MailMessage.create(sRecipient, sSender, sSubject, oBody)

    Rem Ask the user for the URLs of the attached files.
    oDialog = createUnoService("com.sun.star.ui.dialogs.FilePicker")
    oDialog.setMultiSelectionMode(true)
    if oDialog.execute() = com.sun.star.ui.dialogs.ExecutableDialogResults.OK then
        oFiles() = oDialog.getSelectedFiles()
        Rem These two services are simply used to get a suitable file name.
        oUrlTransformer = createUnoService("com.sun.star.util.URLTransformer")
        oUriFactory = createUnoService("com.sun.star.uri.UriReferenceFactory")
        for i = lbound(oFiles()) To ubound(oFiles())
            oUri = getUri(oUrlTransformer, oUriFactory, oFiles(i))
            oAttachment = createUnoStruct("com.sun.star.mail.MailAttachment")
            Rem ReadableName must be entered. This is the name of the attached file
            Rem as it appears in the email. Here we get the file name.
            oAttachment.ReadableName = oUri.getPathSegment(oUri.getPathSegmentCount() - 1)
            Rem The attachment is retrieved from an Url but same as for oBody
            Rem it can be retrieved from a String, an InputStream or a sequence of bytes.
            oAttachment.Data = oTransferable.getByUrl(oUri.getUriReference())
            oMail.addAttachment(oAttachment)
            next i
    endif
    Rem End of creating the email.


    Rem Now we need to send the email.

    Rem First we create a MailUser from the sender address. This is not necessary the
    Rem sender address but it must follow the rfc822 (ie: my surname <myname@myisp.com>).
    Rem The IspDB Wizard will automatically be launched if this user has never been configured.
    oUser = com.sun.star.mail.MailUser.create(sSender)
    Rem User canceled IspDB Wizard.
    if isNull(oUser) then
        exit sub
    endif

    Rem Now that we have the user we can check if they want to use a Reply-To address.
    if oUser.useReplyTo() then
        oMail.ReplyToAddress = oUser.getReplyToAddress()
    endif
    Rem In the same way I can test if the user has an IMAP configuration with oUser.supportIMAP()
    Rem and then create an email thread if necessary. In this case you must:
    Rem - Construct an email message thread (as done previously for oMail).
    Rem - Create and connect to an IMAP server (as we will do for SMTP).
    Rem - Upload this email to the IMAP server with: oServer.uploadMessage(oServer.getSentFolder(), oMail).
    Rem - Once it has been uploaded, retrieve the MessageId with the oMail.MessageId property.
    Rem - Set the oMail.ThreadId property to MessageId for all subsequent emails.
    Rem Great you have successfully grouped the sending of emails into a thread.

    Rem To send the email we need to create an SMTP server. Here's how to do it:
    SMTP = com.sun.star.mail.MailServiceType.SMTP
    oServer = createUnoService("com.sun.star.mail.MailServiceProvider").create(SMTP)
    Rem Now we connect using the SMTP user's configuration.
    oServer.connect(oUser.getConnectionContext(SMTP), oUser.getAuthenticator(SMTP))
    Rem Well, that's it, we are connected, all we have to do is send the email.
    oServer.sendMailMessage(oMail)
    Rem Don't forget to close the connection.
    oServer.disconnect()
    MsgBox "The email has been sent successfully." & chr(13) & "Its MessageId is: " & oMail.MessageId
    Rem Et voilà, you have it...

End Sub


Function getUri(oUrlTransformer As Variant, oUriFactory As Variant, sUrl As String) As Variant
    oUrl = createUnoStruct("com.sun.star.util.URL")
    oUrl.Complete = sUrl
    oUrlTransformer.parseStrict(oUrl)
    oUri = oUriFactory.parse(oUrlTransformer.getPresentation(oUrl, false))
    getUri = oUri
End Function
And there you have it, it only took a few lines of code so enjoy…
However, this is only an example of popularization, and all the necessary error checks are not in place…
How to customize LibreOffice menus:
To allow you to place access to the various features of eMailerOOo wherever you want, it is now possible to create custom menus for commands:
-
ShowIspdbto Configure connection with the LibreOffice Scope. -
ShowMailerto Send a document with the LibreOffice Scope. -
ShowMergerto Merge a document with the Writer and Calc Scope. -
ShowSpoolerto Outgoing emails with the LibreOffice Scope. -
StartSpoolerto Start spooler with the LibreOffice Scope. -
StopSpoolerto Stop spooler with the LibreOffice Scope.
In the Menu tab of the Tools -> Customize window, select Macros in Category to access the macros under: My Macros -> eMailerOOo.
You may need to open the applications (Writer and Calc) and add the macros with the Scope set to the supported applications.
This only needs to be done once for LibreOffice and each application, and unfortunately I haven’t found anything simpler yet.
How to build the extension:
Normally, the extension is created with Eclipse for Java and LOEclipse. To work around Eclipse, I modified LOEclipse to allow the extension to be created with Apache Ant.
To create the eMailerOOo extension with the help of Apache Ant, you need to:
- Install the Java SDK version 8 or higher.
- Install Apache Ant version 1.10.0 or higher.
- Install LibreOffice and its SDK version 7.x or higher.
- Clone the eMailerOOo repository on GitHub into a folder.
- From this folder, move to the directory:
source/eMailerOOo/ - In this directory, edit the file:
build.propertiesso that theoffice.install.dirandsdk.dirproperties point to the folders where LibreOffice and its SDK were installed, respectively. - Start the archive creation process using the command:
ant - You will find the generated archive in the subfolder:
dist/
Has been tested with:
-
LibreOffice 7.3.7.2 - Lubuntu 22.04 - Python version 3.10.12 - OpenJDK-11-JRE (amd64)
-
LibreOffice 7.5.4.2(x86) - Windows 10 - Python version 3.8.16 - Adoptium JDK Hotspot 11.0.19 (under Lubuntu 22.04 / VirtualBox 6.1.38)
-
LibreOffice 7.4.3.2(x64) - Windows 10(x64) - Python version 3.8.15 - Adoptium JDK Hotspot 11.0.17 (x64) (under Lubuntu 22.04 / VirtualBox 6.1.38)
-
LibreOffice 24.2.1.2 - Lubuntu 22.04
-
LibreOffice 24.8.0.3 (x86_64) - Windows 10(x64) - Python version 3.9.19 (under Lubuntu 22.04 / VirtualBox 6.1.38)
-
Does not work with OpenOffice see bug 128569. Having no solution, I encourage you to install LibreOffice.
I encourage you in case of problem ![]()
to create an issue
I will try to solve it ![]()
Historical:
What has been done for version 0.0.1:
- Writing an IspDB or SMTP servers connection configuration wizard allowing:
- Find the connection parameters to an SMTP server from an email address. Besides, I especially thank Mozilla, for Thunderbird autoconfiguration database or IspDB, which made this challenge possible…
- Display the activity of the UNO service
com.sun.star.mail.MailServiceProviderwhen connecting to the SMTP server and sending an email.
- Writing an email Spooler allowing:
- View the email sending jobs with their respective status.
- Display the activity of the UNO service
com.sun.star.mail.SpoolerServicewhen sending emails. - Start and stop the spooler service.
- Writing an email Merger allowing:
- To create mailing lists.
- To merge and convert the current document to HTML format to make it the email message.
- To merge and/or convert in PDF format any possible files attached to the email.
- Writing a document Mailer allowing:
- To convert the document to HTML format to make it the email message.
- To convert in PDF format any possible files attached to the email.
- Writing a Grid driven by a
com.sun.star.sdb.RowSetallowing:- To be configurable on the columns to be displayed.
- To be configurable on the sort order to be displayed.
- Save the display settings.
What has been done for version 0.0.2:
- Rewrite of IspDB or Mail servers connection configuration wizard in order to integrate the IMAP connection configuration.
- Use of IMAPClient version 2.2.0: an easy-to-use, Pythonic and complete IMAP client library.
- Extension of com.sun.star.mail.* IDL files:
- XMailMessage2.idl now supports email threading.
- The new XImapService.idl interface allows access to part of the IMAPClient library.
-
Rewriting of the Spooler in order to integrate IMAP functionality such as the creation of a thread summarizing the mailing and grouping all the emails sent.
- Submitting the eMailerOOo extension to Google and obtaining permission to use its GMail API to send emails with a Google account.
What has been done for version 0.0.3:
- Rewrote the Grid to allow:
- Sorting on a column with the integration of the UNO service SortableGridDataModel.
- To generate the filter of records needed by the service Spooler.
- Sharing the python module with the Grid module of the jdbcDriverOOo extension.
- Rewrote the Merger to allow:
- Schema name management in table names to be compatible with version 0.0.4 of jdbcDriverOOo
- The creation of a mailing list on a group of the address book and allowing to follow the modification of its content.
- The use of primary key, which can be composite, supporting DataType
VARCHARandINTEGERor derived. - A preview of the document with merge fields filled in faster thanks to the Grid.
- Rewrote the Spooler to allow:
- Many other things…
What has been done for version 1.0.0:
- The smtpMailerOOo extension has been renamed to eMailerOOo.
What has been done for version 1.0.1:
-
The absence or obsolescence of the OAuth2OOo and/or jdbcDriverOOo extensions necessary for the proper functioning of eMailerOOo now displays an error message. This is to prevent a malfunction such as issue #3 from recurring…
-
The underlying HsqlDB database can be opened in Base with: Tools -> Options -> Internet -> eMailerOOo -> Database.
-
The Tools -> Add-Ons menu now displays correctly based on context.
-
Many other things…
What has been done for version 1.0.2:
- If no configuration is found in the connection configuration wizard (IspDB Wizard) then it is possible to configure the connection manually. See issue #5.
What has been done for version 1.1.0:
-
In the connection configuration wizard (IspDB Wizard) it is now possible to deactivate the IMAP configuration.
As a result, this no longer sends a thread (IMAP message) when merging a mailing.
In this same wizard, it is now possible to enter an email reply-to address. -
In the email merge wizard, it is now possible to insert merge fields in the subject of the email. See issue #6.
In the subject of an email, a merge field is composed of an opening brace, the name of the referenced column (case sensitive) and a closing brace (ie:{ColumnName}).
When entering the email subject, a syntax error in a merge field will be reported and will prevent the mailing from being submitted. -
It is now possible in the Spooler to view emails in eml format.
-
A service com.sun.star.mail.MailUser now allows access to a connection configuration (SMTP and/or IMAP) from an email address following rfc822.
Another service com.sun.star.datatransfer.TransferableFactory allows, as its name suggests, the creation of Transferable from a String, a binary sequence, an Url (file://…) or a data stream (InputStream).
These two new services greatly simplify the LibreOffice mail API and allow sending emails from Basic. See Issue #4.
You will find a Basic macro allowing you to send emails in: Tools -> Macros -> Edit Macros… -> eMailerOOo -> SendEmail.
What has been done for version 1.1.1:
- Support for version 1.2.0 of the OAuth2OOo extension. Previous versions will not work with OAuth2OOo extension 1.2.0 or higher.
What has been done for version 1.2.0:
- All Python packages necessary for the extension are now recorded in a requirements.txt file following PEP 508.
- Now if you are not on Windows then the Python packages necessary for the extension can be easily installed with the command:
pip install requirements.txt - Modification of the Requirement section.
What has been done for version 1.2.1:
- Fixed a regression allowing errors to be displayed in the Spooler.
- Integration of a fix to workaround the issue #159988.
What has been done for version 1.2.2:
- The creation of the database, during the first connection, uses the UNO API offered by the jdbcDriverOOo extension since version 1.3.2. This makes it possible to record all the information necessary for creating the database in 5 text tables which are in fact 5 csv files.
- The extension will ask you to install the OAuth2OOo and jdbcDriverOOo extensions in versions 1.3.4 and 1.3.2 respectively minimum.
- Many fixes.
What has been done for version 1.2.3:
- Fixed a regression from version 1.2.2 preventing jobs from being submitted to the email spooler.
- Fixed issue #7 not allowing error messages to be displayed in case of incorrect configuration.
What has been done for version 1.2.4:
- Updated the Python decorator package to version 5.1.1.
- Updated the Python ijson package to version 3.3.0.
- Updated the Python packaging package to version 24.1.
- Updated the Python setuptools package to version 72.1.0 in order to respond to the Dependabot security alert.
- Updated the Python validators package to version 0.33.0.
- The extension will ask you to install the OAuth2OOo and jdbcDriverOOo extensions in versions 1.3.6 and 1.4.2 respectively minimum.
What has been done for version 1.2.5:
- Updated the Python setuptools package to version 73.0.1.
- The extension will ask you to install the OAuth2OOo and jdbcDriverOOo extensions in versions 1.3.7 and 1.4.5 respectively minimum.
- Changes to extension options that require a restart of LibreOffice will result in a message being displayed.
- Support for LibreOffice version 24.8.x.
What has been done for version 1.2.6:
- If a reply address was given then it will be used when generating the eml file by the Spooler.
- The extension will ask you to install the OAuth2OOo and jdbcDriverOOo extensions in versions 1.3.8 and 1.4.6 respectively minimum.
- Modification of the extension options accessible via: Tools -> Options… -> Internet -> eMailerOOo in order to comply with the new graphic charter.
What has been done for version 1.2.7:
- The spooler allows opening sent emails either in the local email client (ie: Thunderbird) or online in your browser for accounts using an API for sending email (ie: Google and Microsoft).
- A new tab has been added to the spooler to allow tracking of mail service activity.
- Connections to Microsoft mail servers, which apparently no longer worked, have been migrated to the Graph API.
- For servers that no longer use SMTP and IMAP protocols and offer a replacement API (ie: Google API and Microsoft Graph):
- All HTTP request parameters needed to send emails are stored in the LibreOffice configuration files.
- All data needed to process HTTP responses are stored in the LibreOffice configuration files.
This should allow implementing a third-party API for sending emails just by modifying the Options.xcu configuration file.
- To work, these new features require the OAuth2OOo extension in version 1.3.9 minimum.
- The command to open an email in Thunderbird can currently only be changed in the LibreOffice configuration (ie: Tools -> Options -> Advanced -> Open Expert Configuration).
- Non-refresh of scrollbars in multi-column lists (ie: grid) has been fixed and will be available from LibreOffice 24.8.4, see SortableGridDataModel cannot be notified for changes.
- Opening emails in your browser does not work with a Microsoft account, the url allowing this has not yet been found and it seems that it would not be possible (ie: popup must be open by the Outlook window)?
- Many fixes.
What has been done for version 1.3.0:
- The extension will ask you to install the OAuth2OOo and jdbcDriverOOo extensions in versions 1.4.0 and 1.4.6 respectively minimum.
- Only providers with a third-party API or OAuth2 authentication and have an entry in the LibreOffice configuration will offer OAuth2 authentication by default in the connection setup wizard (ie: IspDB Wizard).
- The
yahoo.comandaol.comemail providers have been integrated. To make setup easier, a link to the page for creating an application password has been added to the connection setup wizard. If you think links to other providers are missing, please open an issue so I can add them back. - Updated Python IMAPClient package to version 3.0.1.
- Thanks to improvements added to the Eclipse plugin, it is now possible to create the extension file using the command line and the Apache Ant archive builder tool, see file build.xml.
- The extension will refuse to install under OpenOffice regardless of version or LibreOffice other than 7.x or higher.
- Added binaries needed for Python libraries to work on Linux and LibreOffice 24.8 (ie: Python 3.9).
- Many fixes.
What has been done for version 1.3.1:
- Updated the Python packaging package to version 24.2.
- Updated the Python setuptools package to version 75.8.0.
- Updated the Python six package to version 1.17.0.
- Updated the Python validators package to version 0.34.0.
- Support for Python version 3.13.
What has been done for version 1.4.0:
- Updated the Python packaging package to version 25.0.
- Downgrade the Python setuptools package to version 75.3.2. to ensure support for Python 3.8.
- Passive registration deployment that allows for much faster installation of extensions and differentiation of registered UNO services from those provided by a Java or Python implementation. This passive registration is provided by the LOEclipse extension via PR#152 and PR#157.
- Modified LOEclipse to support the new
rdbfile format produced by theunoidl-writecompilation utility.idlfiles have been updated to support both available compilation tools: idlc and unoidl-write. - It is now possible to build the oxt file of the eMailerOOo extension only with the help of Apache Ant and a copy of the GitHub repository. The How to build the extension section has been added to the documentation.
- Implemented PEP 570 in logging to support unique multiple arguments.
- To ensure the correct creation of the eMailerOOo database, it will be checked that the jdbcDriverOOo extension has
com.sun.star.sdbas API level. - Writing macros to be able to place custom menus wherever you want. To make it easier to create these custom menus, the section How to customize LibreOffice menus has been added to the documentation.
- Requires the jdbcDriverOOo extension at least version 1.5.0.
- Requires the OAuth2OOo extension at least version 1.5.0.
What has been done for version 1.4.1:
- In the connection wizard, if the given email address is not found in Mozilla IspDB or if you are offline, server names can be simple hostnames and valid ports will extend up to 65535. This is to address issue#10.
- Fixed refresh issues on the second page of the connection wizard by using the UNO service
com.sun.star.awt.AsyncCallback. - Requires the jdbcDriverOOo extension at least version 1.5.4.
- Requires the OAuth2OOo extension at least version 1.5.1.
What has been done for version 1.4.2:
- Support for LibreOffice 25.2.x and 25.8.x on Windows 64-bit.
- Requires the OAuth2OOo extension at least version 1.5.2.
What has been done for version 1.5.0:
- Changed the wizard used when merging emails so that it opens in a dedicated window rather than modal as before.
- Also changed the email Spooler to open in a dedicated window rather than modal as before.
- These two new windows now display a progress bar as well as a status indicator when background tasks are launched.
- If tasks are started while these windows are requested to be closed, then the tasks will be canceled if possible and their completion will be waited for before closing.
- Completely rewritten the email Spooler, which now offers 3 tasks for sending emails, viewing an email, and merging a document:
- Added the XTaskEvent.idl interface to the UNO API. This new interface, which is the transcription of the Python class threading.Event, allows you to control a task executed by the LibreOffice Dispatcher.
- If files are attached to an email and in PDF format, then they will follow the LibreOffice configuration settings found in: File -> Export to -> Export as PDF when being transformed.
- All methods needed for rendering and running in the background now use the UNO service com.sun.star.awt.AsyncCallback for callback.
- If the jdbcDriverOOo extension works without Java instrumentation, a warning message will be displayed in the extension options.
- Many corrections and some new features that I will let you discover.
- Requires the jdbcDriverOOo extension at least version 1.6.0.
- Requires the OAuth2OOo extension at least version 1.6.0.
- Has been tested with LibreOfficeDev 26.2.
What has been done for version 1.5.1:
- Any error occurring during the sending of an email will not affect its status if it happens during preparation and not during sending. This allows the error to be corrected and the sending attempt to be retried.
- It is possible to open an attachment directly from the list of files attached to an email.
- If this operation is performed on an attached file (Writer or Calc) to be merged, the merge fields of this document opened in LibreOffice will follow the selection of the Grids
Available recipientsand/orSelected recipients. - All modal windows now open correctly in modal mode.
- Requires the jdbcDriverOOo extension at least version 1.6.1.
- Requires the OAuth2OOo extension at least version 1.6.1.
What has been done for version 1.5.2:
- Fixed a regression that prevented valid jobs from being submitted to the Spooler for merging.
What remains to be done for version 1.5.2:
-
Add new languages for internationalization…
-
Anything welcome…