
gContactOOo
prrvchr@gmail.com
Your contacts from your Android phone as an HsqlDB database in LibreOffice
 Documentation
Ce document en français.
The use of this software subjects you to our Terms Of Use and Data Protection Policy.
version 1.4.0
Introduction:
gContactOOo is part of a Suite of LibreOffice and/or OpenOffice extensions allowing to offer you innovative services in these office suites.
This extension gives you access, in LibreOffice, to your phone contacts (the contacts of your Android phone).
It uses Google People API to synchronize your remote Google Contacts into a local HsqlDB 2.7.4 database.
This extension is seen by LibreOffice as a database driver responding to the URL: sdbc:address:google:*.
Being free software I encourage you:
- To duplicate its source code.
- To make changes, corrections, improvements.
- To open issue if needed.
- To participate in the costs of CASA certification.
In short, to participate in the development of this extension.
Because it is together that we can make Free Software smarter.
CASA certification:
To ensure interoperability with Google, the gContactOOo extension uses the OAuth2OOo extension which requires CASA certification.
Until now, this certification was free and carried out by a Google partner.
The OAuth2OOo application obtained its CASA certification on 11/28/2023.
Now this certification has become paid and costs $600.
I never anticipated such costs and I am counting on your contribution to finance this certification.
Thank you for your help.

Requirement:
The gContactOOo extension uses the OAuth2OOo extension to work.
It must therefore meet the requirement of the OAuth2OOo extension.
The gContactOOo extension uses the jdbcDriverOOo extension to work.
It must therefore meet the requirement of the jdbcDriverOOo extension.
Additionally, gContactOOo requires the jdbcDriverOOo extension to be configured to provide com.sun.star.sdb as the API level, which is the default configuration.
Installation:
It seems important that the file was not renamed when it was downloaded. If necessary, rename it before installing it.
-
 Install OAuth2OOo.oxt extension
 You must install this extension, if it is not already installed.
-
 Install jdbcDriverOOo.oxt extension
 You must install this extension, if it is not already installed.
-
 Install gContactOOo.oxt extension


Restart LibreOffice after installation.
Be careful, restarting LibreOffice may not be enough.
- On Windows to ensure that LibreOffice restarts correctly, use Windows Task Manager to verify that no LibreOffice services are visible after LibreOffice shuts down (and kill it if so).
-
Under Linux or macOS you can also ensure that LibreOffice restarts correctly, by launching it from a terminal with the command
sofficeand using the key combinationCtrl + Cif after stopping LibreOffice, the terminal is not active (no command prompt).
After restarting LibreOffice, you can ensure that the extension and its driver are correctly installed by checking that the io.github.prrvchr.gContactOOo.Driver driver is listed in the Connection Pool, accessible via the menu: Tools -> Options -> LibreOffice Base -> Connections. It is not necessary to enable the connection pool.
If the driver is not listed, the reason for the driver failure can be found in the extension’s logging. This log is accessible via the menu: Tools -> Options -> LibreOffice Base -> Google Contacts -> Logging Options.
The gContactLog logging must first be enabled and then LibreOffice restarted to get the error message in the log.
Use:
In LibreOffice / OpenOffice go to: File -> Wizards -> Address Data Source…
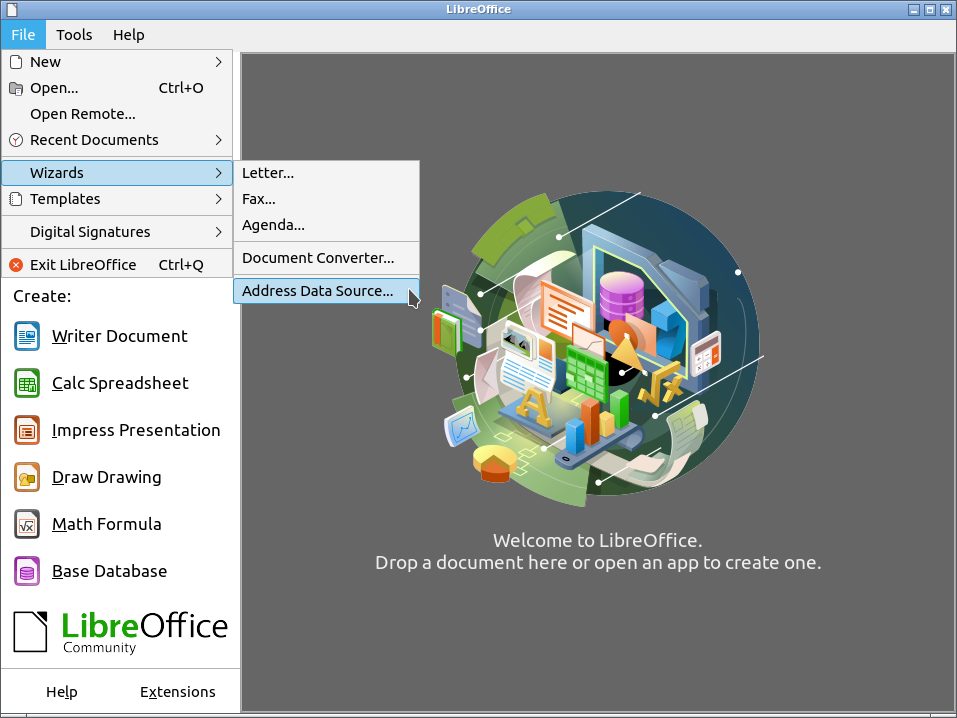
The Address Book Datasource Wizard open.
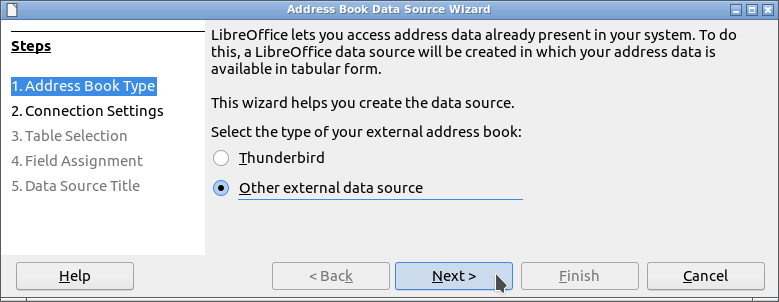
In step: 1.Address Book Type:
- Select: Other external data source.
- Click button: Next.
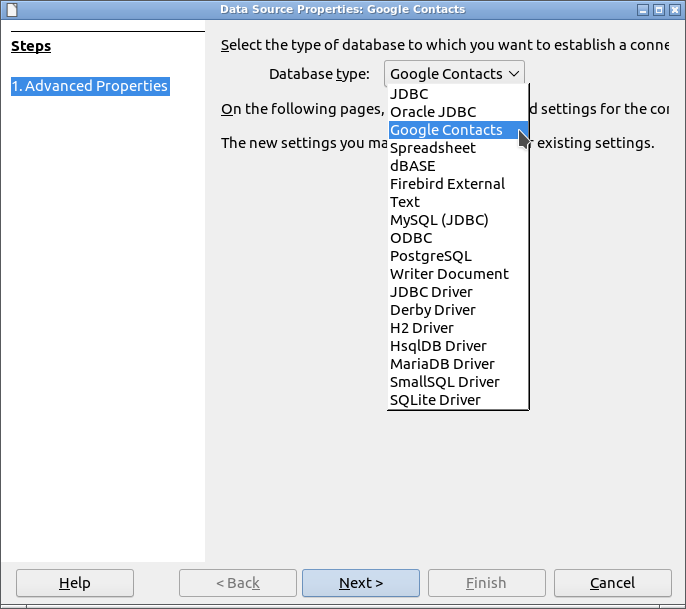
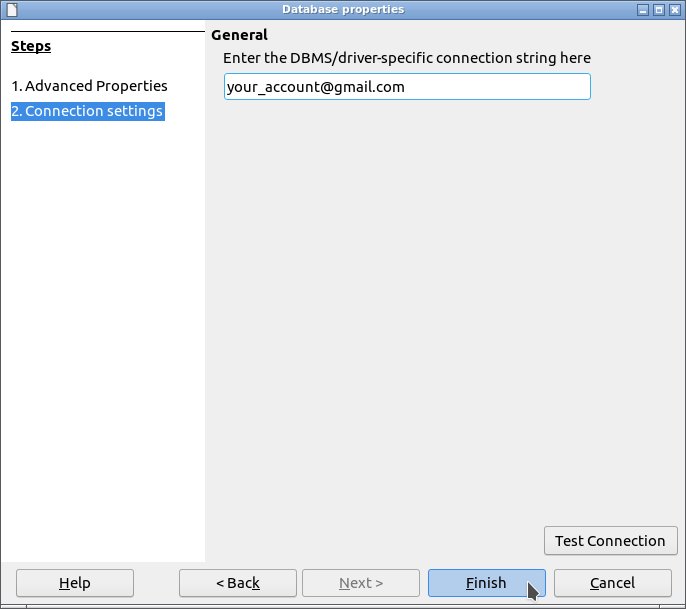
In step: 2.Connection Settings:
- Click button: Settings.

A new wizard opens. Data source properties.
In step: 1.Advanced Properties.
In Database type list:
- Select: Google Contacts.
- Click button: Next.
In step: 2.Connection Settings.
In General: Enter the DBMS/driver-specific connection string here.
- Put your Google account (ie: your_account@gmail.com)
- Click button: Test connection.
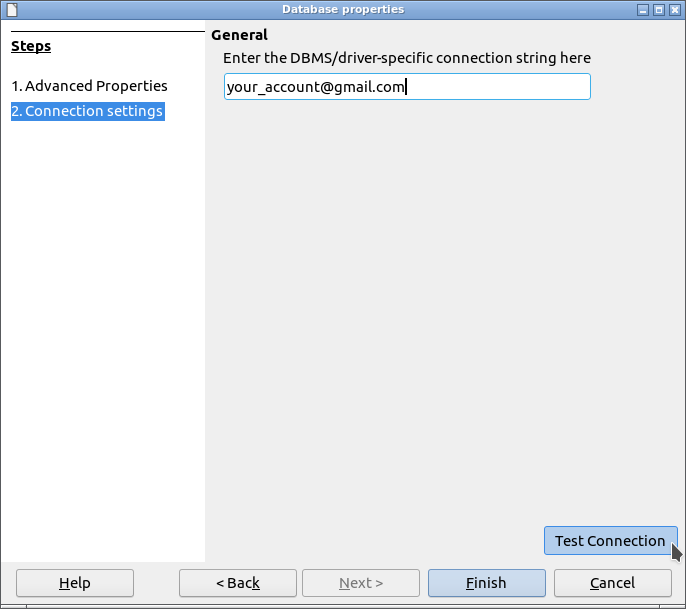
After authorizing the OAuth2OOo application to access your Contacts, normally you should see: Connection Test: The connection was established successfully.
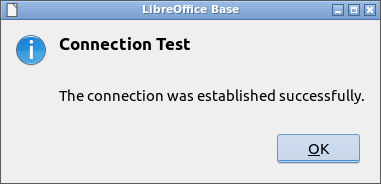
If the connection has been established, you can complete this wizard with the Finish button.
In step: 3.Table Selection.
If your data source has multiple tables, you will be asked to select the primary table.
In this case select the table: All my contacts. If necessary and before any connection it is possible to rename the main table name in: Tools -> Options -> Internet -> gContactOOo -> Main table name.
In step: 4.Field Assignment.
If necessary it is possible to rename the names of the columns of the data source using the button: Field Assignment.
Please continue this wizard with the button: Next.

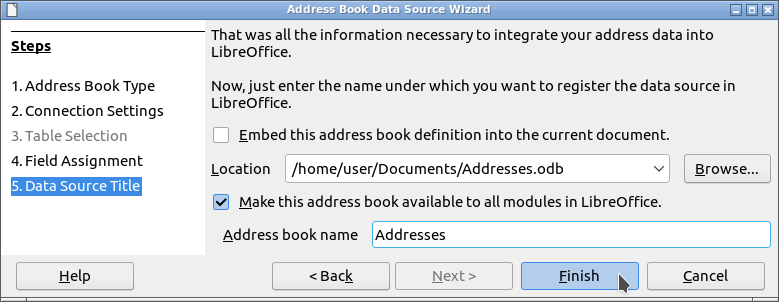
In step: 5.Data Source Title.
You must create an odb file. To do this you must:
- Uncheck the box: Embed this address book definition in the current document.
- Named the odb file in the field: Location.
This odb file must also be made accessible. To do this you must:
- Check the box: Make this address book available to all modules in LibreOffice
- Named the address book in the field: Address book name.
Have fun…
How to build the extension:
Normally, the extension is created with Eclipse for Java and LOEclipse. To work around Eclipse, I modified LOEclipse to allow the extension to be created with Apache Ant.
To create the gContactOOo extension with the help of Apache Ant, you need to:
- Install the Java SDK version 8 or higher.
- Install Apache Ant version 1.10.0 or higher.
- Install LibreOffice and its SDK version 7.x or higher.
- Clone the gContactOOo repository on GitHub into a folder.
- From this folder, move to the directory:
source/gContactOOo/ - In this directory, edit the file:
build.propertiesso that theoffice.install.dirandsdk.dirproperties point to the folders where LibreOffice and its SDK were installed, respectively. - Start the archive creation process using the command:
ant - You will find the generated archive in the subfolder:
dist/
Has been tested with:
-
LibreOffice 7.3.7.2 - Lubuntu 22.04 - Python version 3.10.12 - OpenJDK-11-JRE (amd64)
-
LibreOffice 7.5.4.2(x86) - Windows 10 - Python version 3.8.16 - Adoptium JDK Hotspot 11.0.19 (under Lubuntu 22.04 / VirtualBox 6.1.38)
-
LibreOffice 7.4.3.2(x64) - Windows 10(x64) - Python version 3.8.15 - Adoptium JDK Hotspot 11.0.17 (x64) (under Lubuntu 22.04 / VirtualBox 6.1.38)
-
LibreOffice 24.8.0.3 (x86_64) - Windows 10(x64) - Python version 3.9.19 (under Lubuntu 22.04 / VirtualBox 6.1.38)
-
Does not work with OpenOffice on Windows see bug 128569. Having no solution, I encourage you to install LibreOffice.
I encourage you in case of problem ![]()
to create an issue
I will try to solve it ![]()
Historical:
Introduction:
This extension was written in order to make usable in free software (LibreOffice or OpenOffice) your personal data (your address book) stored in your Android phone.
With the eMailerOOo extension, it can be the data source for mail merge by email, to your correspondents contained in your phone.
It will give you access to an information system that only larges companies are able, today, to implement.
What has been done for version 0.0.5:
-
Integration and use of the new Hsqldb v2.5.1.
-
Writing of a new Replicator interface, launched in the background (python Thread) responsible for:
- Perform the necessary procedures when creating a new user (initial Pull).
-
Writing of a new DataBase interface, responsible for making all calls to the database.
-
Many other fix…
What has been done for version 0.0.6:
-
Driver has a new name: Google Contacts
-
Driver is now registred for a new protocol: sdbc:address:google:your_account@gmail.com
-
The jdbcDriverOOo extension now provides the driver needed to access the HsqlDB database used by gContactOOo.
-
Modifying the Replicator in order to:
- Open and close the database at each replication.
- Go on hold after the last closing of the address book.
- Unload when closing LibreOffice / OpenOffice.
-
Possibility to open the local HsqlDB database by: Tools -> Options -> Internet -> gContactOOo -> View DataBase
-
Many other fix…
What has been done for version 1.0.1:
-
The absence or obsolescence of the OAuth2OOo and/or jdbcDriverOOo extensions necessary for the proper functioning of gContactOOo now displays an error message.
-
Many other things…
What has been done for version 1.0.2:
- Support for version 1.2.0 of the OAuth2OOo extension. Previous versions will not work with OAuth2OOo extension 1.2.0 or higher.
What has been done for version 1.0.3:
- Support for version 1.2.1 of the OAuth2OOo extension. Previous versions will not work with OAuth2OOo extension 1.2.1 or higher.
What has been done for version 1.1.0:
- All Python packages necessary for the extension are now recorded in a requirements.txt file following PEP 508.
- Now if you are not on Windows then the Python packages necessary for the extension can be easily installed with the command:
pip install requirements.txt - Modification of the Requirement section.
What has been done for version 1.1.1:
- Using Python package
dateutilto convert timestamp strings to UNO DateTime. - Many other fixes…
What has been done for version 1.1.2:
- Integration of a fix to workaround the issue #159988.
What has been done for version 1.1.3:
- The creation of the database, during the first connection, uses the UNO API offered by the jdbcDriverOOo extension since version 1.3.2. This makes it possible to record all the information necessary for creating the database in 9 text tables which are in fact 9 csv files.
- The extension will ask you to install the OAuth2OOo and jdbcDriverOOo extensions in versions 1.3.4 and 1.3.2 respectively minimum.
- Many fixes.
What has been done for version 1.1.4:
- Updated the Python python-dateutil package to version 2.9.0.post0.
- Updated the Python decorator package to version 5.1.1.
- Updated the Python ijson package to version 3.3.0.
- Updated the Python packaging package to version 24.1.
- Updated the Python setuptools package to version 72.1.0 in order to respond to the Dependabot security alert.
- Updated the Python validators package to version 0.33.0.
- The extension will ask you to install the OAuth2OOo and jdbcDriverOOo extensions in versions 1.3.6 and 1.4.2 respectively minimum.
What has been done for version 1.1.5:
- Updated the Python setuptools package to version 73.0.1.
- The extension will ask you to install the OAuth2OOo and jdbcDriverOOo extensions in versions 1.3.7 and 1.4.5 respectively minimum.
- Changes to extension options that require a restart of LibreOffice will result in a message being displayed.
- Support for LibreOffice version 24.8.x.
What has been done for version 1.1.6:
- The extension will ask you to install the OAuth2OOo and jdbcDriverOOo extensions in versions 1.3.8 and 1.4.6 respectively minimum.
- Modification of the extension options accessible via: Tools -> Options… -> Internet -> gContactOOo in order to comply with the new graphic charter.
What has been done for version 1.2.0:
- The extension will ask you to install the OAuth2OOo and jdbcDriverOOo extensions in versions 1.4.0 and 1.4.6 respectively minimum.
- It is possible to build the extension archive (ie: the oxt file) with the Apache Ant utility and the build.xml script file.
- The extension will refuse to install under OpenOffice regardless of version or LibreOffice other than 7.x or higher.
- Added binaries needed for Python libraries to work on Linux and LibreOffice 24.8 (ie: Python 3.9).
What has been done for version 1.2.1:
- Updated the Python packaging package to version 24.2.
- Updated the Python setuptools package to version 75.8.0.
- Updated the Python six package to version 1.17.0.
- Updated the Python validators package to version 0.34.0.
- Support for Python version 3.13.
What has been done for version 1.3.0:
- Updated the Python packaging package to version 25.0.
- Downgrade the Python setuptools package to version 75.3.2. to ensure support for Python 3.8.
- Passive registration deployment that allows for much faster installation of extensions and differentiation of registered UNO services from those provided by a Java or Python implementation. This passive registration is provided by the LOEclipse extension via PR#152 and PR#157.
- Modified LOEclipse to support the new
rdbfile format produced by theunoidl-writecompilation utility.idlfiles have been updated to support both available compilation tools: idlc and unoidl-write. - It is now possible to build the oxt file of the gContactOOo extension only with the help of Apache Ant and a copy of the GitHub repository. The How to build the extension section has been added to the documentation.
- Implemented PEP 570 in logging to support unique multiple arguments.
- Any errors occurring while loading the driver will be logged in the extension’s log if logging has been previously enabled. This makes it easier to identify installation problems on Windows.
- To ensure the correct creation of the gContactOOo database, it will be checked that the jdbcDriverOOo extension has
com.sun.star.sdbas API level. - Requires the jdbcDriverOOo extension at least version 1.5.0.
- Requires the OAuth2OOo extension at least version 1.5.0.
What has been done for version 1.3.1:
- Support for LibreOffice 25.2.x and 25.8.x on Windows 64-bit.
- Requires the jdbcDriverOOo extension at least version 1.5.4.
- Requires the OAuth2OOo extension at least version 1.5.2.
What has been done for version 1.4.0:
- If the jdbcDriverOOo extension works without Java instrumentation, a warning message will be displayed in the extension options.
- All modal windows now open correctly in modal mode.
- Requires the jdbcDriverOOo extension at least version 1.6.1.
- Requires the OAuth2OOo extension at least version 1.6.1.
- Has been tested under LibreOfficeDev 26.2.
What remains to be done for version 1.4.0:
-
Make the address book locally editable with replication of changes.
-
Add new languages for internationalization…
-
Anything welcome…